Pages

Wednesday 4 June 2014

Book Review

Hello again.

I fancied a bit of a change today from writing about practical stuff so I thought that I would do a book review. I will state quite clearly before I start that even though I have included a link to Amazon so that you can have a look inside the book, I do not get paid in any way for doing so.

I think that it is quite common amongst knitters that the method you use to cast on or cast off (bind off in the USA) is the method that you were taught when you first started knitting. This certainly was the case for me, for years amazingly. However, I was getting very frustrated with tight neck openings and untidy rib edgings, and finding that so many patterns included CO/BO methods that I just didn't have a clue how to do. Then, one day, browsing the knitting books on Amazon (as you do, if you are anything like me, and enjoy reading about the craft almost as much as you enjoy actually doing it), I discovered 'Cast On Bind Off, 54 Step-by-Step Methods' by Leslie Ann Bestor, available here. I immediately ordered the book and delayed starting my next project until it had arrived (a true feat of will power).

I have had the book for some time now and I can honestly say that it is one of my most used titles. The small (6"x7") size means that it will fit easily into most knitting bags; whenever I pack my knitting when we are going on a trip, I always pop this book into my bag. It always accompanies me to my knitting group meetings every month.The spiral bound pages mean that the book stays open exactly where you want it to.

I haven't used all of the methods in the book (yet) but I have used quite a few, some have become firm favorites such as the Tubular Cast On and Invisible Ribbed Bind Off, for nice, neat, stretchy ribbing. I was never happy with my Kitchener Stitch grafting until I used the instructions in this book and I think that the main reason for this is that the photo illustrations are very clear and correspond with the text extremely well.

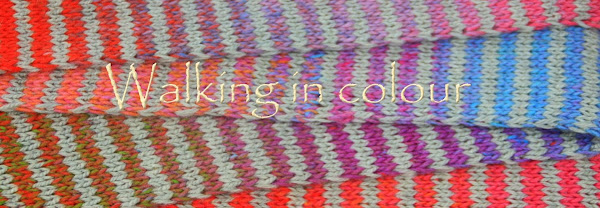
I used the Tubular CO and Invisible Ribbed BO for this stripey, ribbed scarf.

I made this cowl more interesting with a decorative picot CO and BO.

I will present the pros and cons of this book as bullet points:

Pros

  • Compact size makes it very portable
  • Spiral binding allow pages to lie flat when open
  • Initial contents list allows you to find the type of CO/BO that meets your needs, i.e. basic, stretchy, decorative, circular, double-sided, multicolour, provisional, tubular, mobius and sewn
  • There is a small but effective section on basic techniques if you are a beginner knitter
  • The beginning of each section has an illustrated list of the methods covered so that you can see at a glance which will be suitable for your project
  • Each method is covered in detail with photo illustrations of each step placed alongside the relevant text
  • Close up photos show you the front and back of a knitted example of the method and an edge-on view of the finished CO/BO
  • Characteristics of the method are listed and possible advantages are given
  •  The page layout is clear with pleasing printing colours
  • At the end of each method there is a 'getting it right' box of text which highlights particular quirks of the technique and how to deal with them
  • The index is fairly comprehensive 
Cons

  •  The small page size means that some of the more involved methods are spread out over several pages meaning that you have to keep turning the pages as you are working
  •  The photos don't include arrows to show the direction of needle or yarn manouvre
 I cannot say whether I believe this book to be better or worse than similar titles on the market as I have not read any of the others. I have seen books that contain more methods than this one but for beginner knitters or those wanting to expand their repertoire of techniques, this book is ideal. The number of methods is more than adequate to cope with most patterns and I have found them easy to follow and understand. As someone who likes to know why something is done a particular way this book has been satisfactory in providing that information. 

I'm sure that I could access any of these techniques online but I like the fact that no matter where I am (no internet access for example), I can still start or finish a piece of knitting with minimum fuss. I would truly miss this book if I were to lose it. 

I have several bookshelves stuffed with knitting and crochet books so I have a lot of potential material for book reviews. If you feel that this has been helpful then I can make a regular feature of it. Do let me know. 

Cheerio for now


Thursday 29 May 2014

Tutorial: substituting yarn

Hello again

I apologise for the long gap between this and my last post, I had a stinking cold, the builders were back and there just seemed to be so much going on. That's life I suppose!

Anyway, back to yarn substitution. In order to visualise how substituting yarn might effect the final size of a garment, I knitted 9 swatches, each with a different DK yarn. All are 20 stitches wide and 20 rows long, within a garter stitch border. All were knitted with 4 mm needles.


I included yarns from both animal and plant origins as often changing from say wool to cotton, results in the most notable changes in size.  Looking at the image above you can see that even though they all look pretty similar, there are differences, some more obvious than others.

So, lets assume that I have a pattern for yarn 1. This is Drops Lima (65% wool, 35% alpaca) with a gauge of 21 st x 28 rows for a 10 x 10 cm square. My swatch of 20 st x 20 rows should measure 9.5 cm x 7.1 cm, which it does.

I will now go through each of the swatches to see how they would fare if substituted for yarn 1.

Swatch 2.  Rowan Purelife (100% organic wool). My swatch measures 9 cm x 6.5 cm so this garment would knit up smaller in both width and length.

Swatch 3.  Rowan Baby Alpaca (100% baby alpaca). My swatch measures 10.6 cm x 6.5 cm so this garment would be wider and shorter.

Swatch 4.  Rowan Tweed (100% wool). My swatch measures 10.5 cm x 6.5 cm so this would also knit up wider and shorter.

Swatch 5.  Perran Yarns Merino and Silk (75% organically farmed merino wool, 25% tussah silk). My swatch measures 9.5 cm x 6.2 cm so this garment would be the correct width but shorter.

Swatch 6.  Natural Dye Studio Angel DK (70% baby alpaca, 20% silk, 10% cashmere). My swatch measures 10 cm x 7 cm so this would knit up wider and very slightly shorter.

Swatch 7.  King Cole Cottonsoft (100% cotton). My swatch measures 10 cm x 7.4 cm so this garment would be wider and longer.

Swatch 8.  Rowan Pima Cotton (100% cotton). My swatch measures 9.8 cm x 7.2 cm so this garment would be slightly wider and slightly longer.

Swatch 9.  Rowan Summerspun (50% wool, 50% cotton). My swatch measures 9.5 cm x 6.3 cm so this garment would knit up the correct width but would be shorter.

I hope this hasn't been too confusing as I realise that most knitting books and blogs compare swatches by the number of stitches and rows. I wanted you to be able to see how the differences in yarn choice effect size.


These three swatches illustrate how substituting yarn can effect the size of the finished garment. They are all DK yarns but each would give you a different result.

I'm going to use these three swatches to illustrate how a hypothetical garment would look, knitted in each yarn. Lets imagine that you are knitting a plain jumper from the bottom up which requires you to cast on 150 stitches and the length from bottom to neck is 230 rows. The yarn in the top swatch would give you a width of 76 cm and a length of 40.8 cm. The yarn in the middle swatch would give you a width of 84 cm and a length of 37.4 cm. The yarn in the bottom swatch would give you a width of 80 cm and a length of 42.6 cm. If the pattern was designed for the yarn in the top swatch, the jumper knitted in yarn from the middle  swatch would be 8 cm (3 1/4 inches) wider which would make a significant difference to a garment that was fitted.

I hope this hasn't been too confusing. In my next post I will talk about what you can do to compensate for different gauge/tension. You may still be able to use that favorite yarn!

Cheerio for now.

Wednesday 23 April 2014

swatching - a tutorial

Hi again

Following on from my introduction to substituting yarn found here , in this post I will be guiding you through the process of swatching. 

Swatching allows you to measure the gauge of your knitting, that is, how many stitches and rows there are to a given unit of measurement. This is also referred to as a tension square. I prefer the metric system so I use cm but on some yarn labels you may see inches. Most patterns now give gauge for 10 cm but occasionally I have seen stitches per inch or, more commonly, stitches per 4 inches. It is definitely a case of the bigger the better for measuring gauge as this will give you greater accuracy. If you are short of time you may be tempted to measure an inch or a couple of cm (I know I have) but any inaccuracy will be amplified when you knit up your garment which may make a significant difference to the fit. Also, don't be tempted to round up or down your stitch number, if your measured mark falls half way between a stitch, then do your calculations including the half stitch.

Everyone develops their own method of swatching, the following is the way I do it, having tweaked it over the years. I should point out that this method is aimed at producing a swatch in order to measure gauge or tension, swatching to try out different patterns can be any size. For example, a swatch of cables may be long and thin, it is entirely up to you.

 Step 1.

Cast on an appropriate number of stitches. If you have a label for your yarn this should show you the gauge, which may be in the form of a grid or as text.  Add on 10 or so extra stitches to allow for curled up edges.


The yarn for the label above has a gauge of 22 stitches per 10 cm so 30+ stitches would be a good number to cast on. If you don't have a label to guide you then estimate what you think you will need. Just cast on and keep going until you think you have enough. You will need to do this if you are combining two (or more) strands of yarn.

Step 2.

Knit your swatch to a length 1-2 cm longer than you want to measure. I add a garter stitch border around my swatches to give stability and reduce curling if I am knitting in stocking stitch.


 Step 3.

Cast off loosely, then wash and block your swatch. This step is particularly important if you are swatching patterned knitting, such as lace, as your blocked fabric will be a very different size to  unblocked. This brings up the point that your swatch should be knitted in the same pattern as the garment design otherwise you will end up with very different results.

Step 4.

Place a ruler or tape measure along the swatch, horizontally, and place a pin at each end of your measuring unit (i.e. 10 cm), through the rows of knitting. Count the number of stitches between the pins.


In the example above I counted 18 1/2 stitches. I find it easier to measure the gauge whilst the swatch is still pinned to my blocking pads. This stops it from moving around and keeps the stitches even. I use large foam pads for blocking (they look like huge jigsaw pieces), I got mine really cheaply from Amazon.  I like the flexibility of this system, you can join them together in a long strip for a lace scarf or make a huge square for a jumper.

Step 5. 

Now place your ruler or tape vertically and place pins along rows at each end of your measured length. Count the number of rows between the pins.

 
I counted 29 rows. In the photo below I have used an alternative to a ruler or tape measure. I made a square frame out of cardboard where the internal measurements are 10 cm by 10 cm.  It is easy to simply place the square over your swatch and count the stitches and rows. You can make it whatever size you wish, you just have to make sure that your angles are accurate at the four corners.


As you can see, my gauge with this yarn is 18 1/2 stiches and 29 rows to 10 cm, compared to the 22 stitches and 28 rows on the yarn label. Even using a pattern specifically written for this yarn I would end up with a garment the wrong size if I didn't swatch first. In my next post I will be discussing this further. What are the consequences of having a gauge different  to the one given in the pattern? Will the garment be too big, or too small? I will have lots of swatches to show you which I hope will demonstrate clearly how gauge affects the size of your finished garment.

Cheerio for now.


Wednesday 9 April 2014

Substituting yarn


In this blog post, rather than ramble on about what I have been making, I thought that I would pass on a few pearls of wisdom concerning a practical aspect of knitting……yarn substitution. Inexperienced knitters may lack the confidence to use a yarn other than that recommended in a pattern, this is a shame because being able to use different yarns opens up all sorts of possibilities. How many times have you admired a pattern but wanted to knit it in cotton instead of wool, or in a colour that just is not available in the range suggested?  Perhaps you are keen to use a locally produced yarn, or you just couldn't resist that hand-dyed alpaca and silk yarn you saw at a fibre show. In my case, I have experienced ALL of those reasons! I also can't resist mixing yarns, perhaps a strand of lace weight with a 4 ply, or a strand of mohair with a sock yarn. The possibilities of yarn substitution are only limited by your imagination.

 Looking back, I don’t think that I have ever used the yarn suggested in a pattern and have learned, by trial and error, how to go about substituting yarn and still end up with a usable garment. At first I thought, like many new knitters, that if the pattern was written for a specific weight of yarn, such as DK, then all I had to do was choose another DK yarn and all would be hunky dory. Sometimes it worked and sometimes it didn’t. I soon realised that I needed to have a more organised approach and now I have a method that I am happy with. So, here we go, a little foray into yarn substitution.


The key to successful yarn substitution is swatching. I have met knitters who would rather chew off their right arm than knit a swatch and I must admit I was often so impatient to start on a garment that I severely resented the time spent on swatching. I am now a total convert, I actually  enjoy the process. It is worth it  for several reasons, all of which will save you time and energy  (and sanity) in the long run.

You can determine whether your garment will end up the size you want


     The yarn may look very similar in weight but your lovingly worked jumper may end up inches bigger or smaller.


      You can determine the best needle size to achieve the correct fabric 

      You don’t have to use the sizes stated in the pattern but you do need to give this some thought.


      You can examine the swatch fabric to make sure that it has the properties that you want

      Cotton behaves very differently to wool, it tends to stretch with wear  so you may want to consider whether this will affect the result that you are looking for. If the pattern involves Fair-Isle or delicate textural features you can make sure that your chosen yarn will do it justice.  A very fuzzy yarn may come in gorgeous colours  but sharp colour changes will be lost and the overall effect will be disappointing. If the garment is to be worn next to your skin it is important that the fabric feels comfortable. Does the swatch have the drape that you require? Is it too stiff, too open, too thick, too thin? Or, is it just right?


Just in case there are readers who have never swatched at all, in my next post I will guide you through the process, hopefully quite painlessly. 

Until then, cheerio.

Saturday 29 March 2014

Cushions large and small

Hello from a sunny Devon.

I thought that I would take this opportunity to photograph the crocheted cushion I made for my mum, outside, instead of having to set up the lights inside. Much easier and it is lovely to hear the birds sing as I set about my task.


I am quite pleased with the way the cushion has turned out though it took me a while to decide on the final positioning of the squares. I really like how the white edging gives a crisp finish to the colours and ties it all together. This project was a pleasure to do, the pattern was straight forward and the changes of colour kept it interesting. I'm going to have to make a couple for my own sofa I think.

I used 100% cotton, mainly Drops Paris but the pink was King Cole Cottonsoft and the white was Rowan Handknit Cotton. Yes, I know, different brands, different weights. I'm confident enough to substitute yarns and actually quite enjoy doing so. I do always crochet/knit a test swatch to see whether it will work or not. One of the aspects of crafting I particularly enjoy is experimenting with materials, as well as the odd disaster there have been many happy surprises. I just wish that I had written them all down!!! That's one of the reasons I am keen to keep going with this blog, it is a record of my projects.

I wanted to include a little hand-made gift for my mother-in-law, for Mothering Sunday and these lavender pouches, to hang in a wardrobe or place in a drawer, are the result.


I used Liberty Tana Lawn fabric with some odds and ends of ribbon. They smell wonderful and look quite elegant (as Liberty always does) and I have now ordered a kilo of dried lavender from the internet to make some more. I have lots of fabric (my fabric stash is not as huge as my yarn stash but I'm working on it) and thought that it would be nice to pop them into birthday and Christmas gifts. My garden is predominantly wet clay, terrible for growing lavender successfully, otherwise I would dry my own. I am working on that too though.

Sorry, but I had to include this photo of muscari, isn't the purply blue just lovely?


 Cheerio for now. Have a lovely week-end wherever you are.


Monday 24 February 2014

The joys of decorating

Sorry for the lack of posts, but we have been decorating our living room. Any sort of work in this room causes upheaval because we have hundreds, if not thousands, of books and they all need moving out of the way. Ripping out the awful nylon carpet we inherited when we bought the house and laying a solid wood floor has added to the chaos, though has been enormously satisfying. I have decided to take a break from painting today and concentrate on choosing fabric for the curtains and blinds. I always sew my own, which I enjoy doing, but oh dear, I do procrastinate over the choice of fabric. A very pleasant problem to have though. Do you cogitate for days over these sort of decisions or do you know instantly what you want?

Mothering Sunday is coming up in March, here in the UK, and I have started making a gift for my lovely mum, a crocheted granny square cushion cover. I will post a photo when I have finished making it.


I have popped this photo in to cheer up those of you who are affected by grey, miserable weather at the moment. I took this picture on a warm, sunny day last summer, on a walk along the north Cornish coast. Don't you just want to go swimming in that gorgeous blue sea? Oh well, dream on for a few months longer. I love the architectural shape of this umbellifer plant and plan to use this as inspiration for my living room blinds. I am thinking of adding some simple white embroidery to a lovely grey linen, though isn't that creamy white against the deep blue absolutely wonderful!

I have been thinking about another venture that I would value your opinion on. There is an excellent blog by the very talented Clara Parkes that provides comprehensive reviews of yarns aimed at knitters, knittersreview. Being based in the USA the yarns reviewed are predominantly those that can be bought there, though she does review some British yarns such as Rowan. I was wondering whether knitters and crocheters would appreciate a review blog concentrating on British and European yarns. It is something that I would enjoy doing, in fact, it would be a labour of love for me. An excuse to buy tons of different yarn and knit samples, my idea of bliss. So, what do you think? Would I be stepping on toes if I did this?

Thanks for dropping by.
X


Wednesday 5 February 2014

Crochet baskets

I am a little obsessed with crochet at the moment. The internet is to blame.....all those lovely blogs and Pinterest boards just make me want to sit down, get my hook and yarn out and fill my home with colourful throws and cushions. I made some baskets as a start; actually the first basket I made, in white, blue and grey, I gave to my sister for her newly decorated bedroom. I filled it with cotton wool balls and she was thrilled to bits with it. Of course, I omitted to take any photos of it.

However, I had caught the basket bug and it wasn't long before I had three more, one for bits and bobs (the white one), one to throw our cars keys into in the hall (the blue one) and one to store some yarn in (the BIG one).


My fabric stash has always been the sadly neglected sibling of my yarn stash, a sorry situation that I am now correcting with some gusto. Here is a selection of my most recent purchases.

Endless possibilities for these.


I'm thinking of embroidering around some of those wonderful butterflies.
I fell in love with these gorgeous pansies, what fantastic colours.
 I thought that the pansy fabric would make great cushion covers, perhaps as patchwork? I searched through my yarn stash and found these balls of 4 ply wool. The blue is alpaca, cashmere and silk so you can imagine how soft that yarn is. A nice crochet throw to complement the fabric would work a treat. I plan to outline all the crochet squares with a soft pale grey.

Thanks for dropping by.
Until next time, take care and happy crafting!